As in introductory task for the media coursework, our media group have been set the task to re-create the music video for 'Teenage Dirtbag" by Wheatus. During this period we would learn about using the camera correctly and learning it's functions, setting up the tripod correctly, fixing the camera to the tripod safely and correctly as well and taking it off. Placing the tapes inside and out the of the camera safely and finally to be able to gain experience directing, being extra within a shot/main character or using the camera independently. All of this has been completed and taught in our Video Production Sessions.
Introduction To Using The Camera
At the start of the media sessions our teacher show
ed a demonstration on how to work the camera's to shoot clips and shots, He then went over each function of the camera. whare they are located, and the effects they will have on the shot you produce. We was also given a rough guideline on the issues and implications which may arise during the filming process such as too much light exposure, depth of field too high/low, poor weather conditions etc. We were then given in detail the key functions of the camera and what affect they will have of shooting such as zooming in/out, creating a shallow depth of field, panning and movements of the camera when using the tripod.
Watching the original video and creating a story board
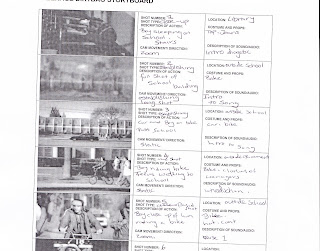
After we had been shown how to work the camera properly and securley we began to the original music video for teenage dirtbag. After watching it several time we began discussing key concepts of the video and shots that we can adapt and put into our class re-make and what we may have to edit or change slightly due to the circumstances we are in a college. We were then shown a typical story board of a music video and how they work. We filled out a story board for the video and listed things such as the shot type, the description of the action happening within the shot, the mise-en-scene that is visible within the shots, a description of the diagetic sounds, location and shot numbers.
Here is a photo scan of part of the teenage dirtbag storyboard which we filmed.

Practice Shots in small groups
After the story board was complete we were then split into 2 or 3 small groups and we were given a few shooting scripts of specific scenes and we had to re-create them. This gave me a hands on experience with working with the camera and it's functions and putting what i had learnt to the test. I also directed a few shots and p
layed an extra when needed.
Shooting Shots in smaller groups
After the story board for the original video was completed and we had a practice with working with the camera and shooting shots from the video. The group was the divided into three smaller groups again and we were given the chance to have some more hands on experience with working with the camera, direction, and being an actor in a shot. During the filming process we worked with a shooting script in which the director would fill out after each take any problems of issues that arised during the filimg therefore displaying what needs to be double checked before the next take is filmed. The story board was similar to the previous one we had drawn up although this story board was more specific to which shots from the original movie each group was asked to re-create. Myself and the group filmed a variety of shots and in different places around the college campus. My group were filming the first 4 shots from the male lead characters point of view.
This is a screenshot of the clip I recorded when working with the camera, I filmed the scene of the main character asleep on the stars which was the first shot to appear in the video after the establishing opening shot, to create the shot I used a mid shot so the characters body was visable i then tracked in onto the character. I found working with the camera really enjoyable and it helped me to gain confidence when using it, learning the functions and working together with a group.

Screenshot 1)
This is a screenshot in which I filmed a short opening scene to the video Teenage Dirtbag. I filmed the clip using hand held. This was my first real experience when filming so I was rather nervous at first, but I gained a good understanding and experience from it which I think helped in my own video.
Screenshot 2)
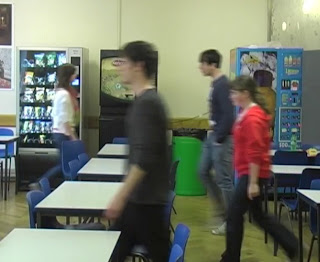
 This screenshot is taken from the clip recorded by Group B, this was recreating one of the beginning scenes from the teenage dirt bag music video.
Here Is The Video remake for Teenage Dirtbag, with work the group filmed together, enjoy!
More Camera Practice and Experience - Timelapse shooting
Before we finally began to film our music video, we started learning about time lapse video shooting, a time lapse is when the camera is placed on a tripod in a set location for example at the sky and is left recording for a peri
od of the time, the footage can then be played back at a higher speed showing a time lapse of the location, in small groups we was given a task of filming differant time lapse shots over the space of 10 minutes or so. My group and I were asked to film a shot of the sky and also a shot of a member of the group changing locations, giving the effect of fading and moving like a ghost. Unfortunately I had difficulties uploading the quicktime movie onto the blog however below I have taken some screenshot's of the time lapse scenes which myself and my group filmed

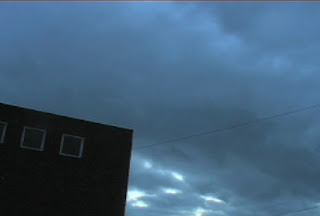
This screen shot is taken from the time lapse shooting of the sky with a section of the college building in the bottom corner with the camera placed at an angle.

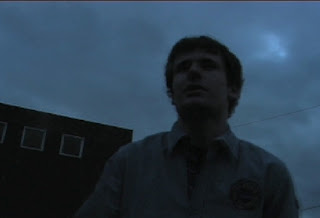
This screen shot is taken from the time lapse shot in which we shot of a member of the group changing locations within the shot.
Practice with Cameras
* The main purpose of practising working with the camera was simply to get more acquainted with the camera and to also get better at filming, so we have the ability to create a good music video. The practising stages with the camera was taught throughout the filming of the Teenage Dirtbag re-make and also the time lapse shots we filmed. Throughout this process we learnt firstly the difference between Auto and Manual settings of the camera, we were advised to use the Manual settings when creating the music video as the manual setting would give better control over the exposure and the focus of the shot which allows us to get the footage exactly how we desired it on the storyboard. Higher Quality footage is also better to film with desired amounts of exposure and focus.
We also learnt about the white balance and how the settings can be edited to adapt to different lighting conditions in terms of whether you are filming inside or outside. The white balance is set so that the camera knows what white is and can be calibrated so that the colours are filmed consistently. If you don't set the white balance setting properly or at all then inconsistencies within the colours within the footage can be affected and result in useless and un-usable footage.
We also learned about the positioning of the camera in terms of Hand held and also tripod mounting. Using the camera with a tripod keeps the camera more sturdy and makes shots such as panning or zooming much easier and more fluent, the tripod will eliminate any camera shakes and will enable you to film more precisely. Tripod's are also recommended for use of zoon control as this method will exaggerate any camera shaking if not used with a tripod. However using Hand Held methods of filming are also valid in their own rights the approach often will have a more realistic feel to it, however the camera is still required to have as much support as possible (for example using the back of a chair), Zooming whilst using a hand held approach to filming is said to be avoidable as it is impossible to stabilise the camera properly as the zoom would cause an exaggeration to any shakey movements.
The music video - pre planning and production
After the induction to video production lessons where we learned about camera controls, camera safety and testing the skills we've been taught through filming the Teenage Dirtbag video shoot and the time lapse shots, the ball was put in our hands to begin filming our own music video. Firstly we began by putting ourselves into groups in which we will create our music video.
Once we had come up with an idea for the music video, we began by conducting a recce analysis of the locations in which we wished to use for the music video. We visited the two locations to get a better insight on whether or not they would be suitable and be able to convey to feel to the video we was aiming to achieve. The main point of the Recce was to identify accessibility of the locations and whether or not we needed to obtain permission to shoot within the location (for example train stations), Luckily for the group no permission was needed and we was able to gain access to the locations hassle free, however with one of our locations (the fields) we needed to consider things such as a time in which the fields had a lower number of pedestrians on the location and also times of the day where the positioning of the sun to avoid difficulty filming, the weather was also a potential problem with the field location as the weather was unpredictable therefore we had to check local forecasts before arranging a suitable day to film there, we also needed to set a reasonable time to film so we had the best amounts of natural light to ensure the footage was the best standard possible.
After we conducted the Recce we began drawing up a storyboard for the music video to identify what shots are to go where, the mise-en-scene within the shot, the cinematography within the shot such as shot top and also the sound for the shots (what chorous, verse etc). The story board was created so the idea of the music video was continued throughout the filming process and to ensure we don't go off track on the theme of the video and that each shot flows well from the previous shot to the next. To ensure we had a well planned and organised storyboard we conducted a storyboard of approx 25 frames (screenshot of storyboard in blog).
Once we had conducted a well planned and detailed story board for the video we then began to devise a schedule for the video, we began by creating a shooting schedule which included available dates for filming for the cast and the crew, after this we conducted a contact sheet with the cast and crew contact numbers, a call sheet is a simple list of everyone involved within the project with contact details such as mobile numbers, email addresses etc, it provides information of the locations, costumes and equipment. the call sheet ensures we had the ability to contact all group members, teachers and technology staff at college. After this we was able to book the camera and equipment for the shoot The shooting schedule was very important within the planning stage of the video as it helps to keep the production process on track which will help us to meet the deadline on time. It also gave us the opportunity to delegate specific roles to each group member such as music, costume, camera booking etc with deadlines to keep the production flowing.
Booking The Equipment - Booking the camera equipment at college was different to the real world use of booking video equipment, as we didn't have to pay hourly charges in which we had the equipment in our possession. However when booking the equipment we had specific guidelines and deadlines in which we had to meet, firstly we had to book the equipment 48 hours in advance and could only hold the equipment for two days at a time due to the shortage a camera equipment at the college and the high demand from all media students. We had to meet the return time and date clearly as it would impact others who need use of the cameras after us. Before booking the equipment we needed to fill out a risk assessment form, this was to cover the college's insurance policies encase any accidental damage occured during the filming processes.
Once we had the camera and the rest of the equipment booked and began filming we created a 'shooting schedule'. the shooting schedule is used to show each shot and how many takes were filmed to achieve a good shot and what went wrong within previous attempts. The purpose of the shooting schedule is to enable us to write information about each shot and to indicate successful shots and bad shots. The shots are numbered and takes numbered which will make the editing process easier as we can easily locate the good footage from the bad.
We also conducted a Risk Assessment, as we believed it was important and vital in the process of filming to understand the potential health and safety risks that can affect myself, the cast, crew, general members of the public. This enabled us to identify potential risks before we went filming examples are things such as loose wires/cables on the floor, noise levels and damage by the environment.
Production - Filming
During the filming stage of the music video we followed the camera settings and safety in which we were taught in the early stages of the course, when filming we used a tri pod and the manual setting on the camera. We used the tripod for the music video as we wanted high quality footage and we used several zooming and also panning shots therefore the tripod was necessary. We filmed the video is a Standard 4:3 ratio. We used close ups within the video for the built up emotional scene of the chorus of the track to give a better representation of the emotion to the viewer.
During the filming of Teenage Dirtbag we used clapper boards when filming each shot, this was to identify each shot by the number so when it comes to editing the video we know which shot was which and to identify the good shots from the bad, so it is easier and faster to crop each shot from another, it also helps to monitor each shot one by one and keeps record of the shots we have filmed and which shots still need to be filmed. During the filming process I was a main part within the music video therefore I spent the majority of my time being in front of the camera than being behind it, however I filmed a variety of the female characters solo shots and another member of my group directed the shoots. We began filming by calling out 'speed' which lets the operator of the camera to start recording, followed by action to inform the cast to begin the shots and then cut to end recording, after each of the shots the director of the shots gave their opinion on whether the shot was successful or not and whether the shot needs to be re-captured, we then filled in the shooting script with the evaluation on each shot.
Post-Production - Editing
After we had finished shooting the music video, the time came for us to begin editing the footage and putting the music video together, for the music video project we used the programme Final Cut Express which is a lighter version of Final Cut Pro. To begin we opened up final cut express and set the project settings to PAL, this means that the programme plays back at a rate of 24 frames per second. The PAL settings are essential to get right otherwise problems with capturing back the footage would occur. The digital editing is Non-Linear which means unlike traditional editing with film it allows you to structure the sequences in any ways we like such as changing the order of the clips to a way in which we desire the video to turn out, this also allows the fluidity and flexibility when editing as we was able to build the sequence in stages working on the ending first for example.
Once the project was set up correctly we then began to capture back out footage onto a mac book pro and saved it to a file so it was openly accessible, to capture back the footage we attached the camera to the laptop using a firewire cable. We then played the footage back at the same time, we then used timecode and transferred it to the computer.
During the editing process we used three recommended stages in which to manage the time responsibly to ensure we had everything finished within time for the deadline. We began with an 'Assembly Edit' where we had selected all of the best shots from the footage and placed them in a rough line in order, this gave us an insight to what we had shot and to see how it all sequences out. We then conducted a 'Rough Draft' where we cut all of the clips together to see how well the video flows together, we than synced up the footage to the song to make sure the lip sync and the song were synced up together. The lyrics and the music of the song are slow and acoustic therefore during this we slowed down the speed of some of the shots to relate better to the song choice. Finally we began the final cut, we began to place everything together and try our best to ensure that the video was in sync with the music and that the videos shots flow well. We decided not to add any effects to the finished video as we felt that the video didn't need any, we were happy with just the camera effects although we did experiment with some effects such as dissolve and split screen, however we felt it all looked a little bit to much and took focus away from the message we wanted to put across within the music video.
No comments:
Post a Comment